Looks like it works! Notice that we are running a Python script on the Agent (as described here).
Friday, November 6, 2009
Xgrid: simple Python scripts
I had a student in my Bioinformatics class who taught himself Java. (Silent cheer). But, of course, that meant he was hooked on classes. I'm not convinced. For standard scripting stuff, the code is so targeted to the problem, reusability is more of a dream than a goal. And complexity is not usually an issue. With that in mind, here are a few simple Python functions to explore a running Xgrid setup.
Looks like it works! Notice that we are running a Python script on the Agent (as described here).
Looks like it works! Notice that we are running a Python script on the Agent (as described here).


Xgrid: passwords
This post is the fifth in a series, the others are here (1, 2, 3, and 4).
As I said, copying a password from one file to another (and still another) seems like a pretty silly hack, and it is. So I joined the Apple mailing list for xgrid-users, and put up the question: how do you do this right? No response yet. And this is the internet's way of telling you "that was a really stupid question." At least that's my take. It's happened before. At least I tried searching the archives first. (Though this is pretty painful if you use the list's tool to do it).
So I went exploring on my single machine Xgrid:
which contains
The password file contains the password we entered in System Prefs, converted to its "hashed" form. The plist file looks like this:

It's interesting that "OnlyWhenIdle" does not match the setting I have in System Prefs. The other directory is
which contains
These are the two password files we created by the

Now, I think we could do this without authentication to the controller by either agent or client. We would simply edit this file to replace "Password" above by "None", as described here.
Also I wrote my new friend at Stanford, and he says that the "hashed" passwords in question are generated by XORing with a simple key (and he gave me the secret handshake). So that leads to: (i) the realization that it really was a stupid question and (ii) the real subject of this post. If Apple wanted to make Xgrid available to non-Server users, they would have decent authentication. They do not, so therefore... (you can figure it out). Now, in the Server manual they say that they use super-duper Server methods to handle the authentication securely. And since you can have a mixed Server/standard node environment you'd probably want to do it the same way for both. But I don't see any reason you'd have to do it that way.
So... let's take a closer look at the password. I set this to be something really sophisticated: 'mypw'. And then, I copied
Let's print them all together to see the pattern:
Conclusions:
#1: the passwords are not stored securely, it is clear that Apple does not want me to use this for anything serious
#2: I never appreciated that XOR has this symmetry:
if
then
How could I miss that?
As I said, copying a password from one file to another (and still another) seems like a pretty silly hack, and it is. So I joined the Apple mailing list for xgrid-users, and put up the question: how do you do this right? No response yet. And this is the internet's way of telling you "that was a really stupid question." At least that's my take. It's happened before. At least I tried searching the archives first. (Though this is pretty painful if you use the list's tool to do it).
So I went exploring on my single machine Xgrid:
/etc/xgrid/agentwhich contains
com.apple.xgrid.agent.plist.default
controller-password
The password file contains the password we entered in System Prefs, converted to its "hashed" form. The plist file looks like this:

It's interesting that "OnlyWhenIdle" does not match the setting I have in System Prefs. The other directory is
/etc/xgrid/controller which contains
agent-password
client-password
com.apple.xgrid.controller.plist.default
These are the two password files we created by the
cp command. The plist file looks like this:
Now, I think we could do this without authentication to the controller by either agent or client. We would simply edit this file to replace "Password" above by "None", as described here.
Also I wrote my new friend at Stanford, and he says that the "hashed" passwords in question are generated by XORing with a simple key (and he gave me the secret handshake). So that leads to: (i) the realization that it really was a stupid question and (ii) the real subject of this post. If Apple wanted to make Xgrid available to non-Server users, they would have decent authentication. They do not, so therefore... (you can figure it out). Now, in the Server manual they say that they use super-duper Server methods to handle the authentication securely. And since you can have a mixed Server/standard node environment you'd probably want to do it the same way for both. But I don't see any reason you'd have to do it that way.
So... let's take a closer look at the password. I set this to be something really sophisticated: 'mypw'. And then, I copied
/etc/xgrid/agent/controller-password to the Desktop (and changed the permissions). A disclaimer, I am not so hot with bytes. I'm sure this is a bit lame, but it works. Getting better at byte manipulation is on my to-do list, along with the same for Unicode. Here is the Python code:Let's print them all together to see the pattern:
Conclusions:
#1: the passwords are not stored securely, it is clear that Apple does not want me to use this for anything serious
#2: I never appreciated that XOR has this symmetry:
if
C = A XOR Bthen
A = B XOR C
B = A XOR C
How could I miss that?
Thursday, November 5, 2009
Xgrid: initial success

I've been exploring Xgrid a little more, and I think I've made significant progress. Following the previous posts (here and here), I fired up an Xgrid Controller from the command line, checked it out in Xgrid Admin, and then did a few examples:
We run /bin/echo with an argument:
Now, to do serious work, you'll want to copy over a directory that has goodies in it. For starters here is a text file in /temp on my Desktop:
And, without further ado, here is a Python script:
Change that last to be a submit request:
Actually, this output is too long to post! It starts like:
There are instructions in Drew McCormack's tutorial for using the result from this specification thingie to build a plist file that can be used for batch jobs that execute multiple commands. But that's hardly necessary if we can run a Python script.
Just remember to check your permissions! I've read that we execute our code in /tmp as user nobody. I'm not sure of that because I couldn't get /bin/ls to work in xgrid. So make sure any user can run the application you want to run (say BLAST, that's our next goal).
One more thing, let's see whether we can get an executable to move from the Client to the Agent and run. Compile this (and test it):
Now do:
minus the log stuff, the output is:
I'd call that a pretty good morning!
[UPDATE:
sudo is only needed for the xgridctl command, not for xgrid. My bad.
Xgrid: warnings and stalled queues
I'm still feeling my way into Xgrid. The lights are out and my hand is on the wall. The most important thing I've learned is that the Xgrid Amin utility (get it from here) is very helpful. It's useful because it is easy to screw up the Controller so that a job submission or other request fails, silently on the command line, but you can inspect the queue using Xgrid Admin and see whether the job is actually there, and inspect logs, even re-run jobs.

The installer puts it in /Applications/Server. I still don't understand why launching xgridcontrollerd gives such variable results, or how I'm screwing things up when I do. I get different combinations of:
Sometimes we hang, sometimes we don't!
Scrubbing the database helps, but only for a while:
After a long series of job submissions and run requests that failed, I open XGrid Admin and see this.

I put the lid of the laptop down to sleep, decide better, and open it up. They've all run! WTF?

One more thing. Even if I set the Xgrid Agent authentication to None in System Prefs, you still need to have these files:
Anybody who knows what the correct way to set these up is, please holler.

The installer puts it in /Applications/Server. I still don't understand why launching xgridcontrollerd gives such variable results, or how I'm screwing things up when I do. I get different combinations of:
Sometimes we hang, sometimes we don't!
Scrubbing the database helps, but only for a while:
After a long series of job submissions and run requests that failed, I open XGrid Admin and see this.

I put the lid of the laptop down to sleep, decide better, and open it up. They've all run! WTF?

One more thing. Even if I set the Xgrid Agent authentication to None in System Prefs, you still need to have these files:
/etc/xgrid/controller/client-password
/etc/xgrid/controller/agent-password
Anybody who knows what the correct way to set these up is, please holler.
Xgrid: firewall can be on
I'm continuing with Xgrid (previous post) and trying to learn more about the firewall. Executive summary: it does not need to be off.
I have it set to "Automatically allow signed software ..." as shown in the screenshot:

The short example from the previous post works in this configuration.
(Note that after the "submit", you will receive a job id and should use that in the last step).
There is much more to say about the firewall. First, Apple is moving to controlling access on a per-Application basis rather than using ports. This makes a lot of sense. It's called the Application Firewall (here is a short blurb about it, and here is the latest addition to my reading list: Code Signing).
And it's evident in the screenshot. Using the + and - buttons, one can manually add an Application (if it is locatable in the finder) to the list of allowed applications. I have checked "Automatically allow."
By steps that I don't remember, in one of my tests I got an alert panel asking about xgridcontrollerd, the Xgrid Controller daemon:

which I answered "Allow" leading to the daemon being listed in the table, but it is not listed there now, and yet Xgrid is working.

I wish I could remember how I did this!
According to the doc (above)
But it doesn't say how one would do this. It would be very useful to know how to emulate the + button from Terminal, since
Also:
I have it set to "Automatically allow signed software ..." as shown in the screenshot:

The short example from the previous post works in this configuration.
(Note that after the "submit", you will receive a job id and should use that in the last step).
There is much more to say about the firewall. First, Apple is moving to controlling access on a per-Application basis rather than using ports. This makes a lot of sense. It's called the Application Firewall (here is a short blurb about it, and here is the latest addition to my reading list: Code Signing).
And it's evident in the screenshot. Using the + and - buttons, one can manually add an Application (if it is locatable in the finder) to the list of allowed applications. I have checked "Automatically allow."
By steps that I don't remember, in one of my tests I got an alert panel asking about xgridcontrollerd, the Xgrid Controller daemon:

which I answered "Allow" leading to the daemon being listed in the table, but it is not listed there now, and yet Xgrid is working.

I wish I could remember how I did this!
According to the doc (above)
You can even add command line applications to this list.
But it doesn't say how one would do this. It would be very useful to know how to emulate the + button from Terminal, since
/usr and its subdirectories like /usr/libexec/xgrid/xgridcontrollerd are not visible from the Finder.Also:
Earlier ipfw technology is still accessible from the command line (in Terminal) and the Application Firewall does not overrule rules set with ipfw; if ipfw blocks an incoming packet, the Application Firewall will not process it.
Xgrid baby steps
I got interested in using Xgrid for "distributed multiprocessing." Although there is quite a bit of information out there, much of it was developed for OS X 10.4 Tiger and it's clear there have been changes (often steps backward in terms of ease of use) with Leopard and now, Snow Leopard. In particular, Apple would like me to purchase Server software, but I don't have $500 to spend when I'm just trying to explore a solution to a potential problem that I don't have yet.
Sources I've found include:
• an extensive set of tutorials by Charles Parnot at Macresearch
• a earlier tutorial by Drew McCormack
• Apple docs (guide and update)
• an article at Mac OS X hints (link)
From what I can tell, all the technology to do this is available with a standard OS X installation, it just doesn't have a pretty, time-saving GUI. First, some terminology. We have a:
• Client---originates the request for a job
• Controller---maintains a queue of jobs and distrbutes them to
• Agents---receive individual jobs and return results
In a high-class setup the Controller would run Server, in this exploration, my MacBook will play all three roles.
I would have liked to follow the Parnot tutorial exactly, but he provides software to set up the controller that isn't explained. Since they are not scripts, there wasn't a way for me to take them apart and see what they do. (And since they're Tiger, who knows if they'll still work?)
Let's try to do it ourselves. The first issue to deal with is the firewall. As described (here and here), Xgrid uses certain ports for communication (4111-4120 plus some other guesses only 4111 according to Apple). No guarantees, and in any event Snow Leopard itself doesn't allow fine-grained control over ports in System Prefs. No doubt, somewhere there is a command-line tool or other method to control this, but I don't know about it. So, for now, I just disconnected from the internet and then turned off the firewall.
Next, set up Xgrid Sharing in System Prefs: under Configure... use localhost as the controller, and set always accept tasks. In the main window, I set Computer Name: localhost. Set a password.
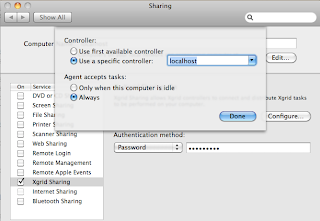
It's not really clear to me what we are setting here. In the small, inner window, it feels like we're doing Client settings, while in the big window, we're doing Agent settings. The password is what the Controller will use to authenticate with us when it sends us a job.
In the second comment to this installment of the tutorial, there is a suggestion to copy the stored hashes of passwords around. I did this on my first attempts, and have not yet tested whether it's necessary.
As you can see from the structure and filenames below, agent has a controller-password, which contains the password that we set in System Prefs. We're copying that file (even though it is not text but a hash) to the controller for use as both the client-password and the agent-password.
The commenter recommends that we do this in Terminal:
We'll use the same password to authenticate (as Client) to the Controller.
Now, it's just a few more commands in Terminal. Start up the daemon:
This gives me an output of 6 warnings and failures including
Hmm... Well, let's try anyway. Start the controller:
You can check its status:
And now we can either "submit" (asynchronous) or "run" a job (substitute the password you used in System Prefs).
With "run" you get back results (almost) immediately, and with "submit" you should get back something like this:
And finally:
My most pressing need is the firewall, I want to open only those ports that are necessary, and preferably only to Xgrid.
According to the macosxhints article, you can turn off authentication by modifying
Now it's time to work through the tutorials step by step.
I also downloaded the server admin tools as described but I haven't used them yet. And there is a "goodies" page on Parnot's site at Stanford, which looks promising. And finally, there is the Apple x-grid users Mailing List. For example, this advice might fix some of the warnings I got when starting up the daemon.
Baby steps.
Sources I've found include:
• an extensive set of tutorials by Charles Parnot at Macresearch
• a earlier tutorial by Drew McCormack
• Apple docs (guide and update)
• an article at Mac OS X hints (link)
From what I can tell, all the technology to do this is available with a standard OS X installation, it just doesn't have a pretty, time-saving GUI. First, some terminology. We have a:
• Client---originates the request for a job
• Controller---maintains a queue of jobs and distrbutes them to
• Agents---receive individual jobs and return results
In a high-class setup the Controller would run Server, in this exploration, my MacBook will play all three roles.
I would have liked to follow the Parnot tutorial exactly, but he provides software to set up the controller that isn't explained. Since they are not scripts, there wasn't a way for me to take them apart and see what they do. (And since they're Tiger, who knows if they'll still work?)
Let's try to do it ourselves. The first issue to deal with is the firewall. As described (here and here), Xgrid uses certain ports for communication (
Next, set up Xgrid Sharing in System Prefs: under Configure... use localhost as the controller, and set always accept tasks. In the main window, I set Computer Name: localhost. Set a password.

It's not really clear to me what we are setting here. In the small, inner window, it feels like we're doing Client settings, while in the big window, we're doing Agent settings. The password is what the Controller will use to authenticate with us when it sends us a job.
In the second comment to this installment of the tutorial, there is a suggestion to copy the stored hashes of passwords around. I did this on my first attempts, and have not yet tested whether it's necessary.
As you can see from the structure and filenames below, agent has a controller-password, which contains the password that we set in System Prefs. We're copying that file (even though it is not text but a hash) to the controller for use as both the client-password and the agent-password.
The commenter recommends that we do this in Terminal:
We'll use the same password to authenticate (as Client) to the Controller.
Now, it's just a few more commands in Terminal. Start up the daemon:
This gives me an output of 6 warnings and failures including
Hmm... Well, let's try anyway. Start the controller:
You can check its status:
And now we can either "submit" (asynchronous) or "run" a job (substitute the password you used in System Prefs).
With "run" you get back results (almost) immediately, and with "submit" you should get back something like this:
And finally:
My most pressing need is the firewall, I want to open only those ports that are necessary, and preferably only to Xgrid.
According to the macosxhints article, you can turn off authentication by modifying
/Library/Preferences/com.apple.xgrid.controller.plist
AgentAuthentication = None
ClientAuthentication = None
Now it's time to work through the tutorials step by step.
I also downloaded the server admin tools as described but I haven't used them yet. And there is a "goodies" page on Parnot's site at Stanford, which looks promising. And finally, there is the Apple x-grid users Mailing List. For example, this advice might fix some of the warnings I got when starting up the daemon.
Baby steps.
Tuesday, November 3, 2009
Update for HeatMapper
When I posted my recent projects, I put up a link to an application called HeatMapper2 (blog, download page). I should have looked it over more carefully first. There is a revised version of the project files up now at the same link.
This was the first Cocoa project I wrote in a new phase starting in September. Among other howlers, the original version shows a confusion between class and instance variables, which doesn't matter much for a non-document app, but aesthetically it grates, just the same. There was also a lot of duct tape in the program, necessitated by resources going away for reasons I didn't understand. Using @property and @synthesize and the maxim DRY, that is fixed now, I think. Please let me know about any bugs you find. I know, it still isn't really MVC code. The view class is also a controller.
The current version has a cheap version of customization. Known column names are colored according to the user's preference. These preferences are saved in the bundle in "textColors.txt." This file has the format:
This was the first Cocoa project I wrote in a new phase starting in September. Among other howlers, the original version shows a confusion between class and instance variables, which doesn't matter much for a non-document app, but aesthetically it grates, just the same. There was also a lot of duct tape in the program, necessitated by resources going away for reasons I didn't understand. Using @property and @synthesize and the maxim DRY, that is fixed now, I think. Please let me know about any bugs you find. I know, it still isn't really MVC code. The view class is also a controller.
The current version has a cheap version of customization. Known column names are colored according to the user's preference. These preferences are saved in the bundle in "textColors.txt." This file has the format:
categoryName1 colorKey1
categoryName2 colorKey2

categoryName1
nameA
nameB

categoryName2
nameX
nameY
Sunday, November 1, 2009
NSError
In Cocoa, objects are almost always "instantiated" in the same way. We get back a pointer to the object instead of the thing itself:
NSError is a little different. For example here we did this:
In the NSString Class Reference it looks like this:
So, what's with NSError **, and what's with &e ? And what does the NSError object actually contain when an error occurs?
NSError inherits from NSObject so it can't be that complicated. Almost invariably you do not actually create an NSError object. Instead, you declare the variable, and then pass it into a method which fills it out for you if an error occurs. The NSError object is a member of a real Cocoa class, with methods and everything.
In the first function above:
In, as we would usually do. (On second thought, when would we ever do anything but send a message to an object?)
So, this is a pointer-to-a-pointer kind of thing, but constructed using "&". I learned about this in C++, but it does actually exist in C.
In the class reference code, the variable is an NSError **, that is, a pointer-to-a-pointer.
I'm not sure why this it's done this way. It kind of reminds me of "Handles"---old time Apple stuff that I remember from the book "Inside Macintosh."
As for what messages NSError object responds to, it may respond to:
• domain (returns a string)
• code (returns an integer that may be used as an enumerated type)
• userInfo (returns a dictionary that is often empty)
So, the sky's the limit for what can be there.
NSArray *A = [NSArray arrayWithObject:@"x"];NSError is a little different. For example here we did this:
In the NSString Class Reference it looks like this:
So, what's with NSError **, and what's with &e ? And what does the NSError object actually contain when an error occurs?
NSError inherits from NSObject so it can't be that complicated. Almost invariably you do not actually create an NSError object. Instead, you declare the variable, and then pass it into a method which fills it out for you if an error occurs. The NSError object is a member of a real Cocoa class, with methods and everything.
In the first function above:
NSError *e; looks normal.In
error:&e the "address-of operator" & means that we are passing in the address of our pointer to the NSError object, rather than the pointer itself So, this is a pointer-to-a-pointer kind of thing, but constructed using "&". I learned about this in C++, but it does actually exist in C.
In the class reference code, the variable is an NSError **, that is, a pointer-to-a-pointer.
I'm not sure why this it's done this way. It kind of reminds me of "Handles"---old time Apple stuff that I remember from the book "Inside Macintosh."
As for what messages NSError object responds to, it may respond to:
• domain (returns a string)
• code (returns an integer that may be used as an enumerated type)
• userInfo (returns a dictionary that is often empty)
So, the sky's the limit for what can be there.
Periodic table puzzle
My son has homework. The task is to try to find 50 of the elements from the periodic table in this matrix of letters, whether by row or column or diagonal, backward or forward. (DISCLAIMER: I typed the puzzle in from his handout, and may have made a mistake here or there).
After he finished, naturally, I wrote a Python script to solve this. I won't impose on you by showing the whole listing. It is here. But there are two things worth noting. First, as before, I used this trick for transposing a matrix (consisting of a list of lists). And I found a new (one-liner) trick i didn't know for reversing a string:
I've never seen this before, and a search of 6 or 7 minutes did not reveal where it is documented, but it's very easy!
Are you're wondering which elements were found? I typed in 74 to look for, as indicated below. The puzzle said that it skipped some---the ones not shown in the 18-column view (lanthanoids and actinoids). I found 72.
After he finished, naturally, I wrote a Python script to solve this. I won't impose on you by showing the whole listing. It is here. But there are two things worth noting. First, as before, I used this trick for transposing a matrix (consisting of a list of lists). And I found a new (one-liner) trick i didn't know for reversing a string:
>>> s = 'abcde'
>>> print s[::-1]
edcba
I've never seen this before, and a search of 6 or 7 minutes did not reveal where it is documented, but it's very easy!
Are you're wondering which elements were found? I typed in 74 to look for, as indicated below. The puzzle said that it skipped some---the ones not shown in the 18-column view (lanthanoids and actinoids). I found 72.
eTOCs for Instant Cocoa

Link page for Cocoa Project downloads
link

Heat Mapper
1 2

Pubmed speaks XML
1 2 3 4

Checkbook Project
1 2 3 4 5 6 7 8 9 10

Bar Grapher
1


Color Picker
1 2 3 4 5

Bindings
1 2 3 4 5 6 7 8 9 10 11 12 13 14
Reading and writing data
1 2 3 4 5
Category
1
Document and icons
1
Dragging
1 2
Auxiliary window nib file
1
NSPredicate
NSDate
NSNumber
NSArray
NSView
NSNotification
Saturday, October 31, 2009
Simple Bayes example, doing the math
Let us continue with the example introduced in the last post, going on to do some calculations using Bayes rule. (If you want to see my original discussion, it's here). Rather than struggle with the layout, I think I'll just post screenshots from the slides I used in class. So, here is the first one:

If we generalize the notation for a minute to Hypothesis and Evidence, we can write the standard form of Bayes rule as:
An easy way to remember this is to think of the H terms on the right-hand side cancelling, though of course they do not actually do so.
Look at the right-hand side. The first term
The second term
The third term, in the denominator, is
where
The left-hand term is, of course, the probability we seek. It is called the posterior probability, the probability of H (here, A) given the evidence observed.


Calculating the posterior is a simple matter, as you can see from the slide above. It is reassuring to get the same answer that we arrived at earlier by a simple, intuitive process. Are you underwhelmed?
The power of Bayes rule lies in its repeated application. Suppose we replace the cookie in the jar (you've eaten it?---well, go get another one from the package my sister sent). Mix well, then draw again. It's another chocolate chip cookie. Our lucky day!
We have to update two values in the equation before we can do the calculation. We do not need to change the likelihood (because we replaced the cookie that was drawn.
We update the prior by setting it equal to 2/3, the posterior that was calculated in the first step. Knowing that we got CC the first time, our prior is now 2/3. We must also update the marginal probability, because some of its underlying parameters have changed. It's like this:


Bayesian analysis:
• is about updating expectations or "beliefs" based on evidence
• requires an estimate of prior probability for the hypothesis
(although we may be deliberately agnostic)
Next time: dice
UPDATE:
It is worth considering the case where the second draw is O rather than CC. Now we have:
And thus we calculate: 1/2 * 2/3 divided by 7/12 = 4/7.
In contrast to this example, we do not return to the naive initial probability of 1/2. Instead, having seen one of each type, we favor A by 1 part in 7 over B. The reason for this is that there are more O cookies overall. Therefore, the second observation of O does not give as much information as the first observation of CC because
The observation that the sun rose today in the east is not very helpful in deciding any hypothesis, even one about the sun, because it always rises in the east.

If we generalize the notation for a minute to Hypothesis and Evidence, we can write the standard form of Bayes rule as:
P(H|E) = P(E|H) P(H) / P(E)An easy way to remember this is to think of the H terms on the right-hand side cancelling, though of course they do not actually do so.
Look at the right-hand side. The first term
P(E|H) is computed as follows: under our model that the cookie jar in question is jar A and jar A contained equal numbers of the two cookie types, then the probability of obtaining either type is easily calculated as 1/2. This is also called the likelihood (of H, in connection with this observation or evidence).The second term
P(H) is the probability that the cookie jar is jar A, given our current state of knowledge. Before the first draw, we might (I would at least) assume that P(A) = P(B), so this term is also 1/2. This is called the prior.The third term, in the denominator, is
P(E). This term is called the marginal probability or sometimes, the evidence. It looks simple but is actually compound: it is P(E) under all hypotheses. That is:P(E) = P(E|H) P(H) + P(E|~H) P(~H)where
~H is read as not H (the hypothesis is not true). Or, in cookie-land:P(A) = P(CC|A) P(A) + P(CC|B) P(B)The left-hand term is, of course, the probability we seek. It is called the posterior probability, the probability of H (here, A) given the evidence observed.


Calculating the posterior is a simple matter, as you can see from the slide above. It is reassuring to get the same answer that we arrived at earlier by a simple, intuitive process. Are you underwhelmed?
The power of Bayes rule lies in its repeated application. Suppose we replace the cookie in the jar (you've eaten it?---well, go get another one from the package my sister sent). Mix well, then draw again. It's another chocolate chip cookie. Our lucky day!
We have to update two values in the equation before we can do the calculation. We do not need to change the likelihood (because we replaced the cookie that was drawn.
We update the prior by setting it equal to 2/3, the posterior that was calculated in the first step. Knowing that we got CC the first time, our prior is now 2/3. We must also update the marginal probability, because some of its underlying parameters have changed. It's like this:


Bayesian analysis:
• is about updating expectations or "beliefs" based on evidence
• requires an estimate of prior probability for the hypothesis
(although we may be deliberately agnostic)
Next time: dice
UPDATE:
It is worth considering the case where the second draw is O rather than CC. Now we have:
P(A|O) = P(O|A) P(A) / P(O)
P(O|A) = 1 - P(CC|A) = 1/2
P(A) = 2/3
(unchanged from before)P(O) = 1 - P(CC) = 7/12And thus we calculate: 1/2 * 2/3 divided by 7/12 = 4/7.
In contrast to this example, we do not return to the naive initial probability of 1/2. Instead, having seen one of each type, we favor A by 1 part in 7 over B. The reason for this is that there are more O cookies overall. Therefore, the second observation of O does not give as much information as the first observation of CC because
P(E) is higher for O. We are more impressed by having drawn the CC cookie, and so we favor A.The observation that the sun rose today in the east is not very helpful in deciding any hypothesis, even one about the sun, because it always rises in the east.
Simple Bayes example
I want to explore a device used by Durbin which they call the "occasionally dishonest casino," and use that to get into Hidden Markov Models. I'll explain the device next time. But the casino example is also a wonderful use of Bayes in action, so I want to talk about that again. I'm going to start by going through an elementary example that I used for my Bioinformatics class.
The example involves cookies. (Everybody loves cookies, right?) So imagine that we obtain two identical cookie jars, which we will call A and B. In the first jar, we put 20 chocolate chip cookies (just like my sister makes), and also 20 of some yucky store-bought brand, for a total of 40. The second jar (outwardly identical to the first) also contains 40 cookies, but the proportions are different, only 1/4 of them are the kind I prefer.

Now suppose I show you a single jar (you can even hold it, as long as you don't peek inside). I carefully draw out a cookie---it's a chocolate chip! :)
The question is: does this new information that we obtained a CC cookie in the draw help us to guess which jar we have in front of us? According to the Bayesian system it does. You would guess (at least if you reason like me) that before the draw there was an equal chance that I had chosen the A or the B jar. Or let's just say that I let you pick at random. We symbolize this as
As before, we can set up a frequency table which includes the marginal probabilities. Before the draw, we have:

We reason as follows. We have observed a chocolate chip cookie in the draw. Initially possible observations in the second row of the table were not obtained, so we draw a line through that row, and recalculate the total. There are 30 CC cookies in total. Since 20 of these are in jar A, assuming the jar was chosen randomly, the probability that the jar is A = 20/30.

My nephew Evan doesn't like this reasoning. But I ask him (and you to consider), what if we knew in the beginning that the B jar contained zero CC cookies? It would be pathological not to update our probabilities in that case. So, what if 39/40 were CC in jar A? It's a slippery slope, and we're sliding.
As Ernst Blofeld tells James Bond: "They have a saying in Chicago..."
Next time: a full Bayesian analysis of the cookie problem.
The example involves cookies. (Everybody loves cookies, right?) So imagine that we obtain two identical cookie jars, which we will call A and B. In the first jar, we put 20 chocolate chip cookies (just like my sister makes), and also 20 of some yucky store-bought brand, for a total of 40. The second jar (outwardly identical to the first) also contains 40 cookies, but the proportions are different, only 1/4 of them are the kind I prefer.

Now suppose I show you a single jar (you can even hold it, as long as you don't peek inside). I carefully draw out a cookie---it's a chocolate chip! :)
The question is: does this new information that we obtained a CC cookie in the draw help us to guess which jar we have in front of us? According to the Bayesian system it does. You would guess (at least if you reason like me) that before the draw there was an equal chance that I had chosen the A or the B jar. Or let's just say that I let you pick at random. We symbolize this as
P(A|CC), the probability that the jar is A, given that the cookie was a chocolate chip. Since the proportion of CC in jar A is higher than in B, it seems reasonable to expect that P(A|CC) is now more than 1/2. How much more?As before, we can set up a frequency table which includes the marginal probabilities. Before the draw, we have:

We reason as follows. We have observed a chocolate chip cookie in the draw. Initially possible observations in the second row of the table were not obtained, so we draw a line through that row, and recalculate the total. There are 30 CC cookies in total. Since 20 of these are in jar A, assuming the jar was chosen randomly, the probability that the jar is A = 20/30.

My nephew Evan doesn't like this reasoning. But I ask him (and you to consider), what if we knew in the beginning that the B jar contained zero CC cookies? It would be pathological not to update our probabilities in that case. So, what if 39/40 were CC in jar A? It's a slippery slope, and we're sliding.
As Ernst Blofeld tells James Bond: "They have a saying in Chicago..."
Next time: a full Bayesian analysis of the cookie problem.
Parsing image links in Blogger XML

I wrote a script that I explained briefly in a previous post (download here: bloggerScript.py), which uses ElementTree in Python to parse content from a blogger XML archive for image links. If you're editing a post, or just using your browser in the normal way and looking at a page's source which contains an image, you'll see something like
<a onblur="try ...The "a" element's name is short for "anchor", that is, a hyperlink. It has two "attributes" (I assume they are named the same in HTML as XML): some javascript code and href="http..." (the link to the full-res image), as well as child elements including <img... with its own attribute src="http...". Note that when displayed as content text, this anchor element has the < symbol rather than the escape code <, whereas in the source XML it is the escaped form. So the code for parsing image links is:
We use the string method "find" to get the indexes flanking the substring of interest. A subtle bug that I had in a previous version was that I failed to specify i+1 in the line:
j = s.find('/a>',i+1)The result was code that apparently worked, but found only the first image if there was more than one. This happens because, on the second time through the loop, i was correctly set to the start of the second element, but j was still the first end-tag, and with
j < i, we get an empty string with s[i+1:j].The second part of the function finds the href for each link and saves it in a list to return. I end up with a containing the title of each post that has at least one image, and all the image links. I just saved them in a text file.
Friday, October 30, 2009
More about XML

This post is in the category of "Google helps Tom get organized." It is so elementary that if you know anything you'd be much better off reading Mark's book Dive Into Python. But, if you know just enough to be dangerous, and are trying to figure out XML for Blogger, you've come to the right place.
XML consists of layers of elements, arranged with a single element as the root, and then various child elements below that, similar to HTML. How is it different? I'm not really sure. I found this on the web:
HTML is about displaying information, while XML is about carrying information
Does that help? No, me neither...
[UPDATE: XML uses tags <stuff>...</stuff> to organize data. They have to be properly "nested," so you can't have the end-tag for the root come before the end, before all of its child elements end-tags have appeared, or the document wouldn't be valid XML. And that's why all of the formatting tags for the HTML that you see in content of a blog-post as XML, have been changed to the escape characters---like < converted to < ]
XML may be formatted to show the structure explicitly, as in Pubmed XML, or not, as in Google Data XML. A formatted version of the data for a blog would look like this:
<feed>
  <child1></child1>
  <child2></child2>
</feed>
Here there is a root element named <feed> with various child elements. The document closes with the end-tag (</feed>) for the root element. In the case of blogger, the child elements are (at least in my case): id, updated, title, link (4 of them), author, generator, and then a bunch of <entry> elements. The first 40 or so entry elements are metadata. It would be nice if they were named differently, but that's how it is.
Any element can have (or not have) child elements, marked with begin-tag and an end-tag, which may themselves be complex. They can also have attributes, one or more name/value pairs typically within the start-tag:
<entry>
  <id>tag:blogger.com,1999:blog-8953369623923024563.post-2518535825745482316</id>
  <published>2009-09-08T05:34:00.000-04:00</published>
  <updated>2009-10-01T10:18:10.585-04:00</updated>
  <category
    scheme='http://schemas.google.com/g/2005#kind'
    term='http://schemas.google.com/blogger/2008/kind#post'/>
Here, category is a child of entry, and it has two attributes scheme and term, which can be accessed from a Python dictionary when parsing with element tree. If there are no attributes, the dictionary is empty. Notice the subtle forward-slash in "#post'/>". That's an abbreviated way of doing the end-tag rather than the full:
</category>.Finally, an element may have a text value, called its content.
Using ElementTree
It helps a lot to know what you're looking for. If you don't, you can find out by perusing the XML. In the case of ElementTree, we traverse the tree structure by doing:
item.getchildren()which returns a list of the child elements. (Item is the variable name I've given to this particular element).
Attributes are found by looking in the attribute dictionary, obtained with
item.attribChild elements can also be searched for by name. The following two functions search for the next element or all elements named title, but only at the next level, any sub-levels are opaque.
item.find(t + 'title')
item.findall(t + 'link')
The variable t above is a string we need to add to the search text, and it's explained below. The content of an element is obtained like this:
item.textNotice the difference between functions, which use the call operator () and objects, which don't.
One confusing thing about the Blogger data is that it is in the "Atom" format, which specifies that the tag of an element, obtained with
item.tagis always prefaced with its namespace (in this case):
{http://www.w3.org/2005/Atom}although it doesn't actually appear as such in the XML. So, for example, if you grab bloggerScript.py referenced in the previous post, and do:
print root.tagThe output is not 'feed' but
{http://www.w3.org/2005/Atom}feedFurthermore, and most important, if you search as we did with "title" above, you must add the namespace tag to the search string. So t has the value:
t = '{http://www.w3.org/2005/Atom}'Is that clear? One more thing, within the content for a post obtained by:
c = item.find(t + 'content')and then:
c.textthere can be found the links embedded in the post. There don't seem to be child elements for the content element: getchildren() returns an empty list for the content. The links have to be parsed by hand. But it's easy, more about that next time.
Thursday, October 29, 2009
Archiving my blog posts

Last time I talked about looking at the Google Data API to archive my blog posts. Of course, there is a download link on the blog under the Settings tab, but I didn't like the look of the XML I get from them. However, I realized that (naturally enough) I get exactly the same data through the API. So I stopped with Google Data, and started trying to parse what I have. I found Mark Pilgrim's book very useful here, not only because it's so clearly written, but it's directly on point.
ElementTree is used to parse the XML. According to the Atom specification, the root element is a "feed", which is qualified with its "namespace." This is its "tag":
{http://www.w3.org/2005/Atom}feedThe child elements of the feed are varied. These are their tags (minus the namespace):
• id
• updated
• title
• link (x 4)
• author
• generator
• entry (many)
You might think when you got down to an entry it would be one of the blog entries. But nope. It's still metadata... Each entry has a child (id) with a long prefix and then its text value is BLOG_PUBLISHING_MODE or BLOG_NAME and so on.
The first authentic post is entry number 58. I distinguish the real entries from metadata by testing whether last character of the id is a digit, as in:
tag:blogger.com,1999:blog-8953369623923024563.post-799567705527714853An item, whether it's an entry or metadata or a child of an entry, may have attributes, stored in a Python dictionary. It may also have a text value, or not. I wrote a script to look through all this stuff (bloggerScript.py).
This post is long enough that I think I'll quit here and talk about parsing for the URL for each of my images another time. Here is the output for one element:
Wednesday, October 28, 2009
Google Data API - baby steps

The Google Data API is designed to make it easy to get data from Google and use it in your application. I did not find it easy. In fact, I really haven't figured it out yet.
What I want to do is to archive my web log, eventually in an automated way. I'd like to have html for the individual posts, preferably human-readable html similar to what I originally typed in the the editor window. The Atom feed would be perfect since the format is compact. Then I could parse it somehow and go grab the original images from blogger at full resolution. This is important because I haven't kept copies of those images. They're usually just screenshots that I typically discard.
Perhaps I would try to organize everything into directories, say individual posts grouped by months or by topic, and maybe change the image links so they point to the local copies of the images. Ideas:
• Export from Blogger
the XML isn't displayed properly by Safari
• the Atom feed looks nice, but I haven't figured out how to get all the posts at once. This looks like it works, but then you see it's been broken into two pages:
http://telliott99.blogspot.com/feeds/posts/default?max-results=500• The standard URL does work
http://telliott99.blogspot.com/search?max-results=500I can save either of these from Safari as a Web Archive (though that has changed---it is actually in a special Apple format). I can grab the source and save it as HTML, but it's pretty ugly HTML.
Google Data API
This API is designed to make it easy to get data from Google and use it in your application. I did not find it easy but I think I got it working a little bit---baby steps. I would love to find tutorials for this stuff.
I grabbed the Python client library for the Blogger data API and installed as usual. I ran:
./tests/run_data_tests.pyand everything looked fine. I didn't run the sample
BloggerExample.py because the version they have requires a log-in and I didn't want to chance screwing up the blog. By digging in the source to try to change that I just got lost. Eventually I found an introductory video at youtube, but it doesn't go far enough. From the video I learned how to do is this:After a deprecation warning for use of the sha module, I get:
I suppose the numbers are ids for the blog and individual posts
So now we need to go farther... After looking more carefully (patiently) at the instructions here, I see that what I'm supposed to do this:
http://www.blogger.com/feeds/profileID/blogsWhere the profileID is obtained from the URL displayed when I click to display my profile.
This just prints the number of blogs I have!
By reading more in the instructions, I finally got some real data:
Output from the dir call includes: 'author', 'category', 'content', 'contributor', 'control', 'extension_attributes', 'extension_elements', 'id', 'link', 'published', 'rights', 'source', 'summary', 'text', 'title', 'updated'.
What I need to do:
• Figure out the URL to send to request a particular entry
• Figure out how to work with the xml data format I'm getting
Subscribe to:
Posts (Atom)