Wednesday, July 30, 2008

Checking with CoreData

I wrote an application about two years ago called "SmartChecking" to act as my checkbook. I talked about it here and it's still available in my Public Folder. I still like it very much. Key features are: auto-dating of new items, auto-detection of checks (deposits are recognized by keywords). Checks are auto-dated and converted to negative values for computing the balance. The best thing is a balance column with two modes, one mode only counts items that have cleared the bank. I never have any trouble balancing my checkbook.

While playing with CoreData I realized that the checking app is a perfect test case for learning more. So, in about 3 hours, I produced a skeleton that works (sort of) and, until the last two features, it had absolutely no code! (I've spent most of the time tweaking the User Interface). Here is a screenshot:


The data model is a single entity (Transaction) with attributes: amount, date, identifier, isCheck, isClear, and number. These are wired up using a single controller in the standard way for table views. The box at the bottom of the window gives details on the selected item. I changed a couple of things that did require some code. First, the date for a new transaction is set to the current date (exactly as described in the Apple tutorial and my last post).

Also, I wanted the + button to not only add a new item, but also switch focus to the name text field. I tried sending the action to my document and then relaying it to the array controller, but that screws up Undo. So I just wrote a new controller that inherits from NSArrayController and notifies my text field to selectText when the add returns. Hillegass has a much more complicated solution. (And I should probably be using a Category, or something). Anyway, here's the code:

class NotifyingArrayController(NSArrayController):
myAppDelegate = objc.IBOutlet()

def init(self):
self = super(NotifyingArrayController,self).init()
return self

def add_(self,sender):
print 'add_'
super(NotifyingArrayController,self).add_(sender)
self.myAppDelegate.myTextField.selectText_(self)

class TransactionMO(NSManagedObject):
def init(self):
self = super(CommitMessageMO,self).init()
return self

def awakeFromInsert(self):
self.setValue_forKey_(NSDate.date(),u"date")


There is still a lot to do, however:

• bind the text color of the amount to check v. deposit 
(How to specify the alternate color?)
• make Return key to bring up a new item,
but only if we are not currently editing.
• do the balance computation using bindings
• implement insert as well as add
• If I use a currency formatter,
it requires me to type the $ sign and
complete the cents. I want it to be smarter.
• implement auto-check numbering

But undo, save and open recent work. Oops, print does not work yet. I should add a toolbar too, for fun.

Hillegass - Ch. 11 Core Data


Look Mom, no code! I just followed the instructions in the text. I don't have a play-by-play for this one. What I find most amazing about this example is that we get drag-and-drop for the ImageView just by clicking editable in IB.

Core Data


I've been exploring Core Data this morning. There's a great set of videos that make up a tutorial to build the project shown above. The only code in the whole thing is down at #13. Here is my cheat sheet (it's handy for debugging the result).

1.  Create New Project => Core Data Doc App and call it CheckIn.
2. Model data.
Open MyDocument.xcdatamodel
Two entities:
VersionRelease, CommitMessage
3. VersionRelease has 1 attribute:
name: string default = untitled
and 1 relationship
commitMessages: destination CommitMessage
To-Many Delete Rule = Cascade
4. CommitMessage has 3 attributes:
message: string default = new commit message
creationDate: Date
isCommitted: boolean default = NO
and 1 relationship
versionRelease: destination VersionRelease
Inverse = commitMessages
5. User Interface.
Open MyDocument.nib
NSTableView with 1 column titled Releases
Two Buttons 25 x 23
6. NSArrayController called ReleasesController
manages entity VersionRelease
Bind managedObjectContext to File's Owner
managedObjectContext
Bind Table Column value to ReleasesController
arrangedObjects w/path = name
Set Buttons target-action to ReleasesController
add and remove
7. Test
8. Another TV with 1 column titled Commit Messages
Below that a text field, a date picker
and a checkbox called is Committed
Two Buttons
9. NSArrayController called MessagesController
manages entity CommitMessage
Bind managedObjectContext to File's Owner
managedObjectContext
Bind contentSet to ReleasesController
selection w/ path = commitMessages

Bind Table Column value to MessagesController
arrangedObjects w/path = message

Bind TextField value to MessagesController
selection w/path = message
(contrary to audio, not the "same thing")

Bind DatePicker to MessagesController
selection w/path = creationDate
Bind CheckBox to MessagesController
selection w/path = isCommitted
Set Buttons target-action to MessagesController
add and remove
10. Test
11. Enhancements
TimeStamp
12. Open MyDocument.xcdatamodel
Change CommitMessage Class (top left) to CommitMessageMO
13. new File Objective-C class CommitMessageMO.m
In .h change NSObject to NSManagedObject
In .c add method:
- (void)awakeFromInsert
{
[self setValue:[NSDate date] forKey:@"creationDate"];
}
14. SearchBox
in MyDocument.nib put in a searchField
Bind Predicate to MessagesController
Customize predicate format (case-insensitive):
message contains[c] $value

Tuesday, July 29, 2008

Undo with PyObjC


Here is the app window for my NSUndoManager demo. It is a document-based application b/c we get the NSUndoManager for free that way, and when I tried getting an instance of it directly (no-document), that didn't work. In my version of the Person class, each new person object has a number and a different expectedRaise. It's all standard.

class Person(NSObject):
expectedRaise = objc.ivar('expectedRaise')
personName = objc.ivar('personName')
count = 1

def init(self):
self.expectedRaise = Person.count * 5.0
self.personName = 'New Person #' + str(Person.count)
Person.count += 1
return self

def setExpectedRaise(self,value):
self.expectedRaise = value

def setPersonName(self,value):
self.personName = value

def description(self):
return self.personName + str(self.expectedRaise).rjust(6)

The buttons are wired to actions as usual. The TextField is bound to an ivar. The ivar "employees" holds the array of person objects. Here is the first part of the document class:


myTextField = objc.ivar('myTextField')
employees = objc.ivar('employees')

def setmyTextField_(self, value):
self.myTextField = value

def init(self):
self = super(PyUndo2Document, self).init()
L = list()
for i in range(2):
p = Person.Person.alloc().init()
L.append(p)
self.employees = NSMutableArray.arrayWithArray_(L)
self.show_(self)
return self

I won't show the standard document methods, but here is my implementation of add_ and remove_, based on Hillegass. "Undo" and "Redo" work correctly. And if we add two persons and then "Undo", the text field updates properly. If we do remove with the button, the text field also updates. But if we then do "Undo delete", the text field does not update. We can see that it has a new value if we press "show". I'm not sure why there is no update.

@objc.IBAction
def add_(self,sender):
print 'add'
undo = self.undoManager()
#undo = NSUndoManager.alloc().init()
inv = undo.prepareWithInvocationTarget_(self)
inv.remove_(self.employees.count())
if not undo.isUndoing():
undo.setActionName_("Insert Person")
self.employees.addObject_(Person.Person.alloc().init())
self.show_(self)

def addObject_(self,p):
self.employees.addObject_(p)

@objc.IBAction
def remove_(self,sender):
print 'remove'
p = self.employees.lastObject()
undo = self.undoManager()
inv = undo.prepareWithInvocationTarget_(self)
inv.addObject_(p)
if not undo.isUndoing():
undo.setActionName_("Delete Person")
self.employees.removeLastObject()
self.show_(self)

@objc.IBAction
def show_(self,sender):
p = self.employees.lastObject()
self.setmyTextField_(p.description())

P.S. According to cocoadev, for a non-document app, we just need to get the undoManager from the window. It works! I set an outlet in the class and do:

undo = self.myWindow.undoManager()

Hillegass - NSUndoManager

In Ch. 8-10 of Hillegass, an app called RaiseMan is developed. It has an NSTableView bound to an array called "employees" which contains Person objects with personName and expectedRaise attributes. It's a document-based application. I'm pretty clear about table views, but I wanted to learn how "undo" works, so I translated the example to Python and PyObjC. However it doesn't seem to work when using an NSArrayController as described for the example. I confirmed that it does work as expected when written in Objective C.

In the first iteration of the project (Ch. 8) everything is standard. The Document class has this method:

- (void)setEmployees:(NSMutableArray *)a
{
if (a == employees)
return;
[a retain];
[employees release];
employees = a;
}


In implementing the version with "Undo", two new methods are added. The first one is:

- (void)insertObject:(Person *)p inEmployeesAtIndex:(int)index
{
NSLog(@"adding %@ to %@", p, employees);
NSUndoManager *undo = [self undoManager];
[[undo prepareWithInvocationTarget:self]
removeObjectFromEmployeesAtIndex:index];
if (![undo isUndoing]) {
[undo setActionName:@"Insert Person"];
[employees insertObject:p atIndex:index];
}
}


The second method (not shown) handles remove in a similar way. Interestingly, the addition of this code changes the behavior of the NSArrayController. It no longer calls the set method for the employees property but instead calls the new method. As Hillegass says, "this happens automatically." That is, the target / selector that are invoked after you send an NSArrayController an insert: action are supposed to be set automatically (where?). If you look in IB you'll see "System Defined":


which suggest you shouldn't go messing around here.

So, the failure of this automatic redirection is not easily solved for the PyObjC example. I haven't been able to find an explanation for this yet. Perhaps there is an example on the web. And since, in Ch. 12 he lets out the secret (that Undo is handled automatically if you use CoreData), I probably don't need to solve this.

However, I did get Undo working in PyObjC, and I'll show that in my next post.

Monday, July 28, 2008

NSValueTransformer


Reading through the first section of the Apple bindings tutorial, they talk about NSValueTransformers and how they could be useful with bindings. Wanting to explore, I read a bit in the documentation for the class, but struggled a before finding this. It was particularly helpful because I'm kind of hazy about class methods. The result is an app that does Fahrenheit to Celsius conversion entirely by the use of bindings and a specialized NSValueTransformer class. It is reversible. Both text fields also have formatters dropped on them. Notice that the name of the transformer in the binding is the class name.


Here is the code:

class PyX2AppDelegate(NSObject):
x = objc.ivar('x')
def setx_(self,value): x = int(value)

def awakeFromNib(self):
self.x = 98.6
self.t = MyTransformer.alloc().init()
NSLog("%s" % self.t.description())

NSValueTransformer.setValueTransformer_forName_(
self.t, u'MyTransformer')

class MyTransformer(NSValueTransformer):

@classmethod
def transformedValueClass(cls): return NSNumber
#transformedValueClass = classmethod(transformedValueClass)

@classmethod
def allowsReverseTransformation(cls): return True

def init(self):
self = super(MyTransformer,self).init()
return self

# Fahrenheit to Celsius
def transformedValue_(self,value):
if value is None: return None
f = float(value)
return (5.0/9.0) * (f - 32.0)

# Celsius to Fahrenheit
def reverseTransformedValue_(self,value):
if value is None: return None
f = float(value)
return ((9.0/5.0) * f) + 32.0

Tic Tac Toe


This project is a rewrite of one I posted here. I don't want to show all the code, but I put the zipped files for the project (including the nib file) on the .mac server. The buttons have an image assigned depending on which player chose that square. This is done with bindings, but the buttons are bound individually to variables in the DisplayController, so there is a variable for each button. I've been trying to figure out a way to do this more elegantly, but no luck yet. I used one-based indexing for the board, which accounts for stuff like L = range(1,10). Here is the ugly code for that class:

class DisplayController(NSObject):
myBoard = objc.IBOutlet()

sq1 = objc.ivar('sq1')
sq2 = objc.ivar('sq2')
sq3 = objc.ivar('sq3')
sq4 = objc.ivar('sq4')
sq5 = objc.ivar('sq5')
sq6 = objc.ivar('sq6')
sq7 = objc.ivar('sq7')
sq8 = objc.ivar('sq8')
sq9 = objc.ivar('sq9')

def setsq1_(self,value): self.sq1 = value
def setsq2_(self,value): self.sq2 = value
def setsq3_(self,value): self.sq3 = value
def setsq4_(self,value): self.sq4 = value
def setsq5_(self,value): self.sq5 = value
def setsq6_(self,value): self.sq6 = value
def setsq7_(self,value): self.sq7 = value
def setsq8_(self,value): self.sq8 = value
def setsq9_(self,value): self.sq9 = value

def init(self):
self.bush = NSImage.imageNamed_('bush')
self.chimp = NSImage.imageNamed_('chimp')
self.blank = NSImage.imageNamed_('blank')
return self

def update_(self,sender,which):
fL = [None,
self.setsq1_,self.setsq2_,self.setsq3_,
self.setsq4_,self.setsq5_,self.setsq6_,
self.setsq7_,self.setsq8_,self.setsq9_]

if which is not 'all': L = [which]
else: L = range(1,10)

for i in L:
marker = self.myBoard.b[i]
if not marker: fL[i](self.blank)
elif b marker == 'P': fL[i](self.chimp)
else: fL[i](self.bush)

Hillegass Challenge: count letters


On p. 90, we're instructed to build an app with a Text Field where the user enters a string, and another one which displays the character count of the string. I did this using bindings. The Text Fields are bound to variables "textField" and "count" and we implement setTextField_ with a check for string value of None, which is what we get when we delete the last character of a string in the Text Field. Continuously update value is checked in the binding.

class PyStrLenAppDelegate(NSObject):
textField = objc.ivar('textField')
count = objc.ivar('count')

def setTextField_(self,value):
NSLog("setTextField_ %s" % value)
if not value: x = '0'
else: x = value.length()
self.setCount_(x)

def setCount_(self,value): self.count = value


respondsToSelector

On p. 108, Hillegass mentions the respondToSelector method in NSObject. He says that an object calls this method on its delegate before sending it a message. Here is a simple illustration (no delegate yet). We don't do anything in the nib for this one. We just get an instance of MyReceiver, and through go_(), we ask whether it responds to the selector for a method. Here is the code:

class PyInvokeAppDelegate(NSObject):
def awakeFromNib(self):
self.myReceiver = MyReceiver.alloc().init()
self.go_(self)

def go_(self,sender):
NSLog("go_ %s" % sender.description())
flag = self.myReceiver.respondsToSelector_(
"absentMethod:")
NSLog("go_ returning %s" % flag)

class MyReceiver(NSObject):
def respondsToSelector_(self, s):
NSLog("Receiver respondsToSelector_ %s" % s)
super(MyReceiver,self).respondsToSelector_(s)

and the (edited) console log:

go_ < PyInvokeAppDelegate: 0x1f1dd80>
Receiver respondsToSelector_ absentMethod:
go_ returning None

Sunday, July 27, 2008

Vlad the Impaler


This post is adapted from the example in the first section of the Apple Bindings docs, at the end of that section, which introduces Vlad, Attila and Co. and their weapons. (This is not about the real Vlad, whose descriptor was apparently well-deserved). We have a Table View that displays three combatants: Maximus (ancient), George (colonial), and Neo (modern). Each combatant has an appropriate choice of weaponry, displayed with a popup button. The code is pretty standard. There is a combatant class which keeps track of its name, possible weapons, and the current selected Weapon:

class Combatant(NSObject):
weaponL = objc.ivar('weaponL')
name = objc.ivar('name')
selectedWeapon = objc.ivar('selectedWeapon')

def init(self): return self

def initWithName_Kind_(self, name, kind):
self = self.init()
self.name = name
if kind == 'ancient':
self.weaponL = ['sword','axe']
self.selectedWeapon = 'axe'
elif kind == 'colonial':
self.weaponL = ['cannon','musket']
self.selectedWeapon = 'cannon'
else:
self.weaponL = ['drone','laser']
self.selectedWeapon = 'drone'
return self

In the AppDelegate's init method, we instantiate three Combatants (one from each era), and save them in a list called combatantL:

class PyFightAppDelegate(NSObject):
combatantL = objc.ivar('combatantL')

def init(self):
Maximus = Combatant.alloc().initWithName_Kind_(
'Maximus','ancient')
George = Combatant.alloc().initWithName_Kind_(
'George','colonial')
Neo = Combatant.alloc().initWithName_Kind_(
'Neo','modern')
self.combatantL = [Maximus, George, Neo]
NSLog("%s" % self.combatantL)
return self

The bindings are set up as shown in the tutorial:


1. Combatant controller => AppDelegate => => combatantL
2. Window title => Combatant controller => selection => name
3. Table Column => Combatant controller => arrangedObjects => name


4. Weapon controller => Combatant controller => selection => weaponL
5. Pop Up Button => Value => Weapon controller => arrangedObjects
6. Pop Up Button => Selected Object => Combatant controller => selection => selectedWeapon.

Key Value Observing


Here is an example to explore Key Value Observing. We have a popup whose Content is bound to the variable L in the AppDelegate and its selectedIndex is bound to the variable i. The Text Field is also bound to the variable i in the AppDelegate. There are three buttons connected to actions of the same names, which change the value of i in different ways: (1) call a non-KVO-compliant method doit(), (2) use an accessor set method for the i variable, or (3) call willChangeValueForKey_("i"), call the doit() method, and call self.didChangeValueForKey_("i"). The Observer class is registered to observe the Key Path "i."

2008-07-27 21:54:56.189 PyKVO[2873:10b] go1
2008-07-27 21:54:56.194 PyKVO[2873:10b] observe: 1
2008-07-27 21:54:56.919 PyKVO[2873:10b] go2
2008-07-27 21:54:56.925 PyKVO[2873:10b] observe: 2
2008-07-27 21:54:56.926 PyKVO[2873:10b] observe: 2
2008-07-27 21:54:57.799 PyKVO[2873:10b] go3
2008-07-27 21:54:57.799 PyKVO[2873:10b] observe: 3
2008-07-27 21:54:57.801 PyKVO[2873:10b] observe: 3
2008-07-27 21:54:59.863 PyKVO[2873:10b] observe: 4
2008-07-27 21:54:59.864 PyKVO[2873:10b] observe: 4

The action go1_ (doit()) results in notification to the Observer, as does use of go2_ (setI_()). But go2_ results in duplicate notifications, as does calling go3_, which I thought was the correct way for a non-compliant change. Changing the text field in the window sends duplicate notifications as well. So apparently, use of the setter or editing the textField sends both "willChange" and "didChange" notifications, whil changing the variable directly sends only one, probably "didChange").

Here is the code:

class PyKVOAppDelegate(NSObject):
i = objc.ivar('i')
L = objc.ivar('L')

def init(self):
self.L = list('ABCDE')
self.i = 0
return self

@objc.IBAction
def go1_(self,sender):
NSLog("go1")
self.doit()

def doit(self):
if self.i == len(self.L)-1:
self.i = 0
else: self.i += 1

def setI_(self,value):
self.i = value

@objc.IBAction
def go2_(self,sender):
NSLog("go2")
self.setI_(2)

@objc.IBAction
def go3_(self,sender):
NSLog("go3")
self.willChangeValueForKey_("i")
self.doit()
self.didChangeValueForKey_("i")

class Observer(NSObject):
appDel = objc.IBOutlet()

def awakeFromNib(self):
self.appDel.addObserver_forKeyPath_options_context_(
self,'i',NSKeyValueObservingOptionNew,None)

def observeValueForKeyPath_ofObject_change_context_(
self, k, O, change, context):
v = O.valueForKey_(k)
NSLog("observe: %s" % v)

Hillegass Ch. 5,6


Hillegass has a fun example using the NSSpeechSynthesizer class, which can vocalize a string. The application shown here grew organically---it's composed of several different layers. The app window looks like what's shown above.

1. In the first part, we have a Text Field in the window whose value is bound to the variable textField, as shown previously. The speaker is an instance of NSSpeechSynthesizer with the default voice ("Alex"). The speak action just feeds the string to speaker. In this version, the second button was labeled "Stop", and just called speaker.stopSpeaking().

2. Next we change the label and action on this button to "Switch", as shown in the screenshot. We set the button to be enabled if we are not currently speaking. (In the initial example we only enable "Stop" if we were speaking). We do this by binding the button's Enabled attribute to the variable notSpeaking. We change this flag in the action "speak", and change it back in "speechSynthesizer_didFinishSpeaking", which gets called because we've set ourselves to be the delegate of speaker. (Actually, I'm not sure why this works. Technically, we should call an accessor method for notSpeaking in order to KVO compliant).

3. The third part uses a programmatic method to alter the action triggered by pushing the "Switch" button. When we push it the first time, it calls "switch_", as wired up in IB. However, as part of this function we change the action to be "method2_" as shown in the code, and we can see that this works by logging to the Console. This uses the @objc.signature decorator. Notice that the "setAction_" method gets the string corresponding to the Objective C selector for the new method. (Also, I've used the signature string "@@:v" because the method takes a second (object) argument---I'm not sure if this really matters.)

4. Finally, we allow the user to choose a voice. This example uses a popup button. The Content of the popup is bound to a variable which holds a list of names corresponding to the voices. These are extracted as shown in "setVoices". The selectedIndex of the popup is bound to our variable of the same name, so when we're asked to speak we retrieve the voice from the voice list using that index. There is a weird thing about popups where the selectedIndex is not set until the user touches the popup, so we have to check for that. Here is the code:

class PySpeakAppDelegate(NSObject):
textField = objc.ivar('textField')
notSpeaking = objc.ivar('notSpeaking')
voiceL = objc.ivar('voiceL')
nameL = objc.ivar('nameL')
selectedIndex = objc.ivar('selectedIndex')

def init(self):
s = NSSpeechSynthesizer.alloc().initWithVoice_(None)
self.speaker = s
self.speaker.setDelegate_(self)
self.setVoices()
self.notSpeaking = True
self.textField = 'Hi, my name is George Washington'
return self

def setVoices(self):
L = NSSpeechSynthesizer.availableVoices()
self.voiceL = L
DL = [NSSpeechSynthesizer.attributesForVoice_(v) for v in L]
self.nameL = [D.objectForKey_('VoiceName') for D in DL]
NSLog("%s" % self.nameL)

@objc.IBAction
def speak_(self,sender):
if self.selectedIndex: i = self.selectedIndex
else: i = 0
NSLog("%i Say: %s" % (i, self.textField))
self.speaker.setVoice_(self.voiceL[i])
self.notSpeaking = False
self.speaker.startSpeakingString_(self.textField)
pass

def speechSynthesizer_didFinishSpeaking_(
self,speechSyn,flag):
NSLog("didFinishSpeaking_")
self.notSpeaking = flag

@objc.IBAction
def switch_(self,sender):
NSLog("Method 1")
sender.setAction_("method2:")

@objc.signature('@@:f')
def method2_(self,sender):
NSLog("Method 2")

Saturday, July 26, 2008

Properties and attributes

I started reading about Cocoa Bindings, trying to be a little more systematic. The first chapter says:
Cocoa applications generally adopt the Model-View-Controller (MVC) design pattern. When you develop a Cocoa application, you typically use model, view, and controller objects, each of which performs a different function. Model objects represent data and are typically saved to a file or some other permanent data store. View objects display model attributes.
...
A binding is an attribute of one object that may be bound to a property in another such that a change in either one is reflected in the other. For example, the “value” binding of a text field might be bound to the temperature attribute of a particular model object.

So, we learn that models have attributes, but they never explain what the difference is between a property and an attribute. Does it have to do with models and views or with class variables and instance variables?

In the docs describing the Objective-C 2.0 language, there is a page which says
You can think of a property declaration as being equivalent to declaring two accessor methods. Thus, for example,
@property NSString *name;

is equivalent to:
- (NSString *)name;

- (void)setName:(NSString *)newName;

A property declaration, however, provides additional information about how the accessor methods are implemented (as described in “Property Declaration Attributes”).

So I gather that a property is like an instance variable, except that it implicitly refers to the the accessor methods (and how they work) as well.

I'm not so sure about attributes, but one place I've run into them before is with text. An NSAttributedString is, of course, a string with attributes, e.g. the font. So attributes are things about an object that control the way it acts. That's all the further I've got, and I'm still confused.

NSTableView - updating the view


The problem I want to solve next is to update an NSTableView using bindings. That is, given a change to the underlying data, we want the view to update automatically. However, if we make the change directly, it won't propagate to the view. I haven't yet read the Cocoa Bindings Programming Topics, so maybe the answer is somewhere in that document, but I haven't found it by skimming. Instead, I found the answer on a mailing list answer written by Scott Stevenson. (I've lost track of the link). Anyway, he mentioned a function called "mutableArrayValueForKey" which I'd never heard of, and he gave the lines which I've used in my code below. Apparently you can call the function on any KVO compliant object, and use it to update that object's value.

class PyBind6AppDelegate(NSObject):
MA = objc.ivar('MA')

def awakeFromNib(self):
L = [ {'name':'Groucho','uid':'1'},
{'name':'Chico','uid':'2'},
{'name':'Harpo','uid':'3'} ]
self.MA = NSMutableArray.arrayWithArray_(L)

@objc.IBAction
def go_(self,sender):
D = {'name':'Zeppo','uid':'4'}
bindingsArray = self.mutableArrayValueForKey_('MA')
bindingsArray.addObject_(D)
NSLog("%s" % bindingsArray.description())

As usual, I've wired up a button so that I can see what result a particular change triggered by the button makes to the app window. The screenshots shown above are before and after views.

OK. That's enough about bindings for now. I'm going to continue with Hillegass (and read the Apple docs on KVO, KVC and Bindings) and then I'll get back with more.

Dynamic Table View

Here is a simple kind of editable Table View. The NSTableView itself (actually, the NSTableColumn) does not have editing enabled. Instead, we provide a text box and a + button to allow editing. We check to see if a row is selected, and add the new text after that row.


I've put the code for the Controller in a separate class. The class is instantiated with a blue cube in the nib and outlets and actions are wired up in the usual way. (Don't forget to import it in the App Delegate file). Here is the code:


class MyTVController(NSObject):
tv = objc.IBOutlet()
tf = objc.IBOutlet()
addButton = objc.IBOutlet()
deleteButton = objc.IBOutlet()

def awakeFromNib(self):
self.L = ['John','Paul','George','Ringo']
self.tv.setDelegate_(self)
self.tv.setDataSource_(self)
self.tv.reloadData()

@objc.IBAction
def add_(self,sender):
value = self.tf.stringValue()
NSLog("add_ %s" % value)
i = self.tv.selectedRow()
if i == -1: self.L.append(value)
else: self.L.insert(i+1,value)
self.tv.reloadData()

@objc.IBAction
def delete_(self,sender):
NSLog("delete_")

def numberOfRowsInTableView_(self,tv):
return len(self.L)

def tableView_objectValueForTableColumn_row_(
self,tv,tc,r):
return self.L[r]

Cocoa Bindings - Pop Ups

Here is a minimally reworked example from the old page. We have two Pop Up Buttons in the window, where the values available in the lower one depend on what is selected in the upper one.


The code uses a dummy class to which we add attributes (at least, I think that's what they're called). All I know is, you can't just use an NSObject here. I don't remember where I saw this originally. But this is pretty slick.

class PyBind5AppDelegate(NSObject):

def init(self):
self = super(PyBind5AppDelegate, self).init()

family = MyObject.alloc().init()
family.name = 'family'
family.who = ['Sean', 'Tom', 'Joan']
friends = MyObject.alloc().init()
friends.name = 'friends'
friends.who = ['Nyles', 'Slawek']

self.people = [family,friends]
return self

class MyObject(NSObject):
def init(self): return self

Here is how the bindings are set up. The Array controller and the first (top) popup's Content binding are standard. The first popup has an additional binding to get the selection index and the second popup is bound to that selection as the Controller key.


The next thing is to use bindings to update the model based on what is selected. I could solve this by setting the popups as outlets of the AppDelegate and asking them directly. To do it with bindings, I tried using the popup bindings for SelectionIndex and SelectedObject. (Only one of these can be used at a time---why?) Anyway, the SelectedObject worked, but only for the bottom button, and...it screwed up how the buttons look when the app runs. The method that worked was to add variables it and ib (for index top and index bottom) with set methods, and also a button / action method to report on their values. The popups SelectionIndex bindings are set as follows:


When the app first loads, report gives 'None' for both variables. If I click on a popup but don't change the value, it reports correctly, and if I change the value it reports correctly. So as long as you test for None, it works!

Cocoa Bindings - NSImage


Here is an example of bindings using an NSImageView. The window of our app contains an NSImageView and a button labeled "switch." The left screenshot is upon loading, the middle is after clicking the button once, and then the right after clicking again.

The button is connected to an action of the same name in the AppDelegate. In the Bindings Inspector, we set the NSImageView's binding for Value to be the AppDelegate with a Model Key Path of "img."

Here is the code for the AppDelegate. We first load two images that have been added to the project under Resources (I grabbed them from Wikipedia). The button's action does what it says.

class PyBind2AppDelegate(NSObject):
img = objc.ivar("img")

def init(self):
self = super(PyBind2AppDelegate, self).init()
self.image1 = NSImage.imageNamed_("bush")
self.image2 = NSImage.imageNamed_("chimp")
return self

def awakeFromNib(self):
self.img = self.image1
NSLog("%s" % self.img.name())

@objc.IBAction
def switch_(self,sender):
if self.img.name() == 'bush':
self.img = self.image2
else:
self.img = self.image1

And here is a similar example where we have a text field and a slider, both of which have a binding of Value to the AppDelegate with a Model Key Path of 'x.' The slider's binding also has update value continuously selected.

Here is the code:

class PyBind4AppDelegate(NSObject):
x = objc.ivar('x')

def awakeFromNib(self):
self.setX_(50)

def setX_(self,value):
self.x = int(value)

NSTableView - with bindings

I was having trouble using bindings with an NSTableView, but then I found a tutorial on the web written by Bob Ippolito (pdf). It's relatively old (2004) but it still works. I followed the instructions, and this is what I got.


Only one function is needed (in the AppDelegate):

    def passwords(self):
return( [ {'name':'Larry', 'uid':1},
{'name':'Moe', 'uid':2},
{'name':'Curly', 'uid':3} ] )

The bindings are as follows:
Array Controller => contentArray => File's Owner
Model Key Path = "delegate.passwords"

Table Columns => Value => Array Controller
controllerKey = arrangedObjects
Model Key Path = "name" or "uid"

One tricky part when dealing with an NSTableView is to know what is actually selected currently. What I do is bring up an Inspector window, then the name of that window will change to reflect the value of the current selection. For example, when you click on an NSTableView, it will cycle through Scroll View, Table View, or Table Column if you click in the body, or Table Header View if you click in the header. Be sure that when you set the binding, you're in Table Column.

One problem with this solution is that it's a one-way binding. My next step will be to figure out how to get the model to reflect editing in the Table View, and how to get changes to the model reflected in the Table View.

I did test that we can bind to the AppDelegate with a Model Key Path of "passwords." When we use File's Owner, the message is sent to the instance of NSApplication, which forwards it to its delegate, and we end up in the same place. I'm not sure whether this makes any difference.

Thursday, July 24, 2008

NSTableView - without bindings

I'm supposed to be working on Hillegass, but I got interested in another problem. On my old pages, I showed some examples of using bindings with NSTableView. I want to revisit this issue, and work through a series of examples starting with a one-way binding where the table view is bound to our data source, and working up to a more complex case where the data source is also bound to the table view (where changes to the GUI are reflected automatically in the data source).

On the left is the window of my app when it starts up, and on the right is the window after I've clicked the button a few times.


We have a button labeled "go" and an NSTableView (without scrollbars and not editable). The NSTableView is connected in IB as an outlet of the AppDelegate called tv. The button is connected to an action of the same name in the AppDelegate.

In order to serve as a data source for the table view, the AppDelegate implements the methods shown at the end of the listing. The data comes from an NSMutableArray called ds. We set up the data source in applicationDidFinishLaunching_() by calling addObjectsFromArray_() and feeding it a Python list of NSNumber objects. In the same function, we tell the tv that we are the data source.

The action happens in the go_() method. We pick a random NSNumber object from the data source, double its value, and replace that object in the data source. At the end, we tell the tv to reloadData. All manual, but it works. Here is the code:


from Foundation import *
from AppKit import *
import random

class PyX1AppDelegate(NSObject):
tv = objc.IBOutlet()
ds = NSMutableArray.alloc().init()

def applicationDidFinishLaunching_(self, sender):
NSLog("Application did finish launching.")
self.ds.addObjectsFromArray_(
[NSNumber.numberWithInt_(1),
NSNumber.numberWithInt_(2),
NSNumber.numberWithInt_(3)])
NSLog("%s" % self.ds.description())
self.tv.setDataSource_(self)

@objc.IBAction
def go_(self,sender):
NSLog("go: %s" % self.ds.description())
N = self.ds.count()
i = random.choice(range(N))
n = self.ds.objectAtIndex_(i).intValue()
self.ds.replaceObjectAtIndex_withObject_(
i,NSNumber.numberWithInt_(n * 2))
m = self.ds.objectAtIndex_(i).intValue()
NSLog("%i %i %i" % (i,n,m))
self.tv.reloadData()

def numberOfRowsInTableView_(self,tv):
return self.ds.count()

def tableView_objectValueForTableColumn_row_(
self,tv,c,r):
return self.ds.objectAtIndex_(r).intValue()


Because of the way the bridge works, we could also do without the Cocoa objects and use a simple list of ints.

ivar

import objc
help(objc.ivar)

gives this:
Help on class ivar in module __builtin__:

class ivar(object)
| ivar(name, type='@', isOutlet=False) -> instance-variable
|
| Creates a descriptor for accessing an Objective-C instance variable.
|
| This should only be used in the definition of Objective-C subclasses, and
| will then automaticly define the instance variable in the objective-C side.
|
| 'type' is optional and should be a signature string.
|
| The name is optional in class definitions and will default to the name the
| value is assigned to

So, as we might have expected, when we call ivar("x","i"), the i refers to the object's type (int). The reason all this is needed is that in Key-Value coding, accessor functions for an object named "x" should be named "x" and "getX." The name duplication is somehow OK in Objective C but not in Python, and objc.ivar somehow makes this work.

Cocoa Bindings - Elementary

In this post I want to explore bindings in the very simplest way. I made a page a few years ago with more on it, but here we're starting small. (I should note that those examples are broken now because of the objc.ivar stuff, so I'll have to revisit them).

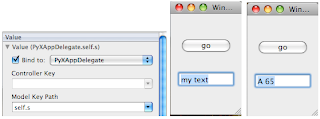
In XCode, make a new project called PyX as a standard Cocoa-Python Application, and in IB, I add to the window a button (labeled "go") and an NSTextField. In the PyXAppDelegate file put this code:

from Foundation import *
from AppKit import *

class PyXAppDelegate(NSObject):
s = objc.ivar("s")
x = 64

def applicationDidFinishLaunching_(self, sender):
NSLog("Application did finish launching.")
self.s = 'my text'

@objc.IBAction
def go_(self,sender):
NSLog("go: %s" % sender.description())
self.x += 1
self.s = "%s %i" % (chr(self.x), self.x)

Go back to IB and hook up the button to the AppDelegate (it's sitting on the MainMenu.xib window). In addition, select the text field, and bring up the Bindings Inspector from the Tools menu. Bind the text field to the AppDelegate with the model key path as shown in the left-hand screenshot (it can be "s" or "self.s"). When I run the app, the window looks like the middle, and after I push the button once, it looks like what's on the right. Every time the button is pushed, we change the value of the variable self.s, and because the NSTextField is bound to that variable, it gets updated automatically. That's the absolute simplest demo of bindings that I can think of.


To have editing in the text field be reflected in our model object, we need to do two more things. First, in IB with the text field selected, bring up the Bindings Inspector and check the box marked "Continuously Updates Value." Then, add an accessory method to set the variable named s:

    def setS_(self,value):
NSLog("setS %s" % value.description())
self.s = value

That's it!

Hillegass Ch. 3

This chapter introduces the idea of composition. OOP enthusiasts may frequently use inheritance to construct new classes. "X is a Y, so X inherits from Y." But Hillegass says it's much more common to employ the "X uses Y, so X contains a Y" approach in Objective C.

The application in this chapter imports a simple class called LotteryEntry, each instance of which has two variables that are numbers (NSNumber objects) and one date (NSCalendarDate). In the main script we'll loop once to construct some LotteryEntry instances, store them in an array, and then display the result.

Here is the code for the LotteryEntry class. It uses a function from objc ("objc.ivar()") which I don't understand, but I know it is designed to make Python instance variables play nice with bindings, as we'll see in the next post. (And no, I don't understand what the 'i' is all about yet).

from Foundation import *
import objc
import random

class LotteryEntry(NSObject):
x = objc.ivar(u'x','i')
y = objc.ivar(u'y','i')
d = objc.ivar(u"date")

def init(self):
print "init LotteryEntry"
self = super(LotteryEntry, self).init()
return self

def prepareRandomNumbers(self):
print "prepareRandomNumbers",
R = range(1,101)
self.setX_(
NSNumber.numberWithInt_(
random.choice(R)))
self.setY_(
NSNumber.numberWithInt_(
random.choice(R)))
print self.x, self.y

def description(self):
sec = self.date.secondOfMinute()
s = NSString.alloc().initWithFormat_(
"%s: %d and %d" % (
sec,
self.x,
self.y))
return s

def setX_(self,n): self.x = n
def setY_(self,n): self.y = n
def setDate(self):
self.date = NSCalendarDate.calendarDate()

Here is the main script.

from Foundation import *
import LotteryEntry
import time

def report_(array):
for i in range(array.count()):
L = array.objectAtIndex_(i)
print L.description()

def main():
array = NSMutableArray.alloc().init()
for i in range(3):
L = LotteryEntry.LotteryEntry.alloc().init()
L.prepareRandomNumbers()
L.setDate()
array.addObject_(L)
time.sleep(1.0) # to make dates interesting
report_(array)

main()

This app does not have a GUI. We run it in the usual way from Terminal, and this is what it prints:

init LotteryEntry
prepareRandomNumbers 38 52
init LotteryEntry
prepareRandomNumbers 78 25
init LotteryEntry
prepareRandomNumbers 47 82
4: 38 and 52
5: 78 and 25
6: 47 and 82

Hillegass Ch. 2

As I promised in my very first post, I want to show some simple examples exploring Cocoa using PyObjC. Make sure you have the Developer Tools installed (either from a Leopard install disk, or from here---choose the free ADC Online Membership). I'm using the 3rd Edition of Hillegass. It has a few new chapters but otherwise appears very much the same as the 2nd Ed.

1. In XCode, do New Project => Cocoa-Python Application.

2. From the outline view select Resources => and double-click on MainMenu.xib to start Interface Builder.

3. Lay out the GUI. Here we need two buttons labeled "Seed" and "Generate", and an NSTextField. These objects are found in the Library window, which can be navigated using an outline view. The text field is under Views & Cells => Inputs & Values. Just drag them to the Window we are building. Save.

4. Click on the XCode Project window to go back to XCode and create a controller class. From File => New File... select Cocoa => Python NS Object subclass and call it MyController.py. Add the following code to the class replacing the pass statement:

class MyController(NSObject):
myTextField = objc.IBOutlet()

@objc.IBAction
def seed_(self,sender):
NSLog("seed")

@objc.IBAction
def generate_(self,sender):
NSLog("generate")

The file for the class will be under whatever pane was selected in the outline view when you did File => ... above. Move it to Classes. Open PyXAppDelegate.py there, and add an import statement for your class:
import MyController


Save.

5. Create an instance of the Controller in IB by dragging a controller object (blue cube) from the Library to the window MainMenu.xib. Select it (it's labeled "Object"), then go to the menu and do Tools => Identity Inspector (or double-click and press the I). Rename the class "My Controller." The name should auto-complete. IB is aware of what is present in our XCode project. In fact, one advantage of step 4 is that IB can use the decorators to help us set up the connections between the GUI elements. Not only the myTextField outlet but also the two actions "seed:" and "generate:" should be visible. If not try saving.

6. Now just control-drag to set up connections. Hillegass tells you to consider "which object needs to know about the other one," which I found pretty confusing. Instead, think about the direction in which information must flow. It will go from the "seed" button (when pressed) to the "MyController" object. Ditto for the "generate" button. And information will go from "MyController" to the text field. When you do these control-drags a little black window should come up to allow you to select the correct action or outlet. Save.

7. Go back to XCode and do Build And Go. If there is an error, look at Run => Console for hints. One issue I had is that XCode inserted a tab rather than four spaces in the decorator lines above. Check for consistency by doing View => Text => Show Spaces.

Another problem I had was with the decorator @objc.IBAction. When I ran into this before, I added the IBOutlet() call to a completed project (from the old XCode / IB), and I didn't actually use the IBAction part, and the code worked. Here, I am setting up the project from scratch, and it helps a lot to let IB know what methods we have in our controller. But when I made a mistake and used (), like you would for the outlet, I got the error shown in the console:

TypeError: IBAction() takes exactly 1 argument (0 given)


I tried a few things (like adding self as the argument, but self isn't known since we don't have an __init__ here). Then I remembered that decorators don't normally look like that, and the argument objc.IBAction is receiving is just the name of the function. So I removed the parentheses:

          
@objc.IBAction


That works fine. Of course, if you actually want the program to do something, you need to flesh out the class:

class MyController(NSObject):
myTextField = objc.IBOutlet()

@objc.IBAction:
def awakeFromNib(self):
NSLog("MyController-awakeFromNib")
now = NSCalendarDate.calendarDate()
self.myTextField.setObjectValue_(now)

@objc.IBAction:
def seed_(self,sender):
NSLog("seed")
#random.seed(time.time())
random.seed()
self.myTextField.setStringValue_("seeded")

def generate_(self,sender):
NSLog("generate")
number = random.choice(range(1,100))
self.myTextField.setIntValue_(number)

Just remember that PyObjC is an open source project. There is a lot of old (unfortunately undated) documentation around, like this stuff, much of which doesn't seem relevant any more, that no one has the time to weed out. But, there are still a few pearls, like this and this. Anyway, one of my objectives is to work through all this using the modern tools and approaches, and figure it out.

Friday, July 11, 2008

simple graphics with svg


As described in the Wikipedia article, Scalable Vector Graphics (SVG) is a specification for XML that allows simple 2D graphics. It provides a nice alternative to other methods for producing graphics under OS X, because the files can be viewed as text with any text editor, while Safari and other browsers render them as graphics. To convert to another format, just take a screenshot. Other methods are available, including PyObjC / Cocoa and wxpython, but SVG is extremely simple.

Here is a script with Python code to write an SVG file and display it using Safari. The first section just contains boilerplate text needed in our svg file. Next, we define functions to generate the code for circles and rectangles, as well as text. In the last section, we define two functions to write the output file and automatically call Safari to show the graphic.

The following lines are the only specific code for our example (except that the opacity of the blue rectangle was set to 0.6 in the function makeRect).

c = makeCircle(x=150,y=150,radius=75,fill='red')
r = makeRect(x=140,y=120,w=250,h=250,rx=40,
fill='blue')
t = makeText(x=50,y=50,
font='Verdana',size=36,fill='purple',
text='Hello SVG world!\n')

The image is a png screenshot since blogger doesn't support svg. The actual svg file looks like this: